
10 Best Exercises To Strengthen Your Rotator Cuff
Whether you lift weights, rock climb, play sports, surf, swim, or engage in almost any type of physical activity, there’s a good chance you’ve experienced some sort of shoulder pain.
Every year, over 13 million Americans see a physician for shoulder pain,1 with over 1-in-5 people having a tear in their rotator cuff.2 Rotator cuff tears become increasingly common as we age, and have a high correlation with manual labor work. Sure, some of this is can be attributed to bad luck, but it’s usually not that simple. There are a lot of varying factors that could lead to rotator cuff tears and other shoulder pathologies.
Before we jump into those factors, let’s first talk about what the rotator cuff is.
What Is The Rotator Cuff?
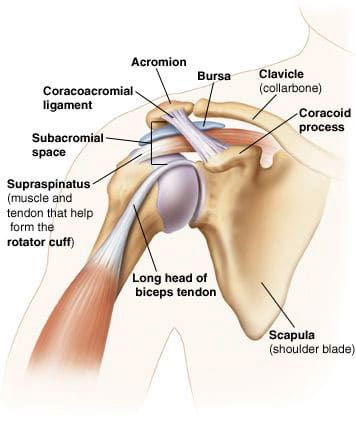
The “rotator cuff” is a term used to describe for 4 muscles that primarily help to stabilize the glenohumeral joint, aka the shoulder. These muscles include supraspinatus, infraspinatus, teres minor, and subscapularis.
The shoulder joint is a highly mobile joint, meaning it has a lot of range of motion. While this large degree of freedom enables a wide range of movements, it’s also the shoulder’s greatest weakness – the shoulder can be dislocated more easily than any other joint.
To help stabilize the joint, the rotator cuff pulls the scapula (the shoulder blade) and the humerus (the arm bone) into each other and keeps them in place. Even though the rotator cuff is critical to stabilizing the shoulder joint and ensuring proper shoulder function, many people neglect training this important muscle group.
When the rotator cuff is not working properly, the humerus can slide out of place (usually going too far forward or upward), which can cause strain to the front of the shoulder, or an impingement to the top of the shoulder, both which can lead to further tearing of the rotator cuff.
When people do include the rotator cuff in their training program, they tend to focus solely on the strength of the rotator cuff. Reason being, the rotator cuff muscles can easily be isolated with specific movements and these strength exercises are the most commonly prescribed rotator cuff exercises by trainers, physical therapists, and MDs.
However, just like any other muscle group, the rotator cuff requires strength, flexibility, and stability exercises to function optimally.
Anatomy of the Rotator Cuff
Here’s a quick breakdown of each muscle, where it’s located, and what it does.
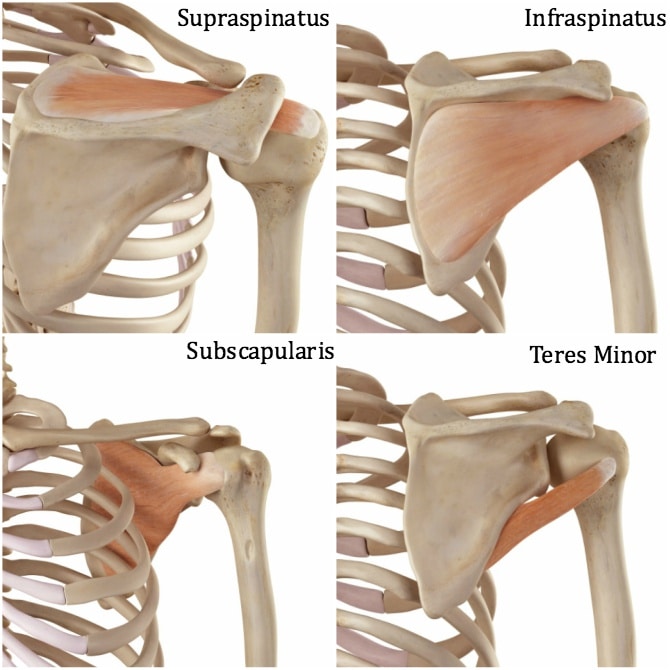
Supraspinatus: Ends at the top of the humerus, and is susceptible to impingement .
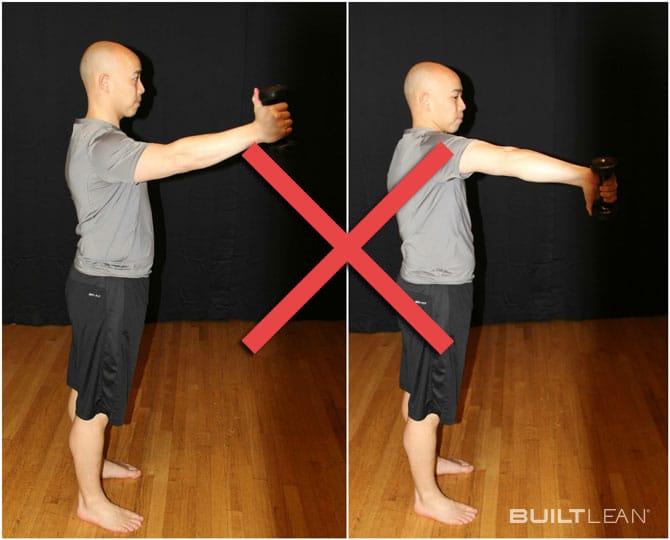
TIP: This is important – don’t perform the “empty can” exercise! This is an extremely outdated and poor exercise that was previously thought to strengthen the supraspinatus. Originally, people thought that the empty can exercise targeted and isolated the supraspinatus because of the high electromyographic output (EMG), but it turns out that the high EMG signal happens because the supraspinatus is stretched (the thumbs down position) and pinched at the end range in this position (the reason you can’t raise your arm very high).
Infraspinatus: Located below the spine of the scapula, and is responsible for external rotation and stabilization of the shoulder joint.
Infraspinatus is strengthened using one of the most common rotator cuff exercises you’ll see – standing external rotation with a band. This muscle is great to isolate, and this exercise is a good beginner rotator cuff exercise.
Teres minor: Located right next to the infraspinatus, it helps to externally rotate your shoulder when your arm is abducted to the side.
External rotation with abduction is also a great beginner exercise to do with a resistance band, but pay extra attention to keeping your shoulder away from your ear.
Subscapularis: The only rotator cuff muscle that performs internal rotation of the shoulder. It’s found on the inside of the shoulder blade.
What Causes Rotator Cuff Tears?
There are a various types of tears and probable causes. There are also several factors that can contribute to these tears. The main thing to know is that rotator cuff weakness is not the direct cause of a torn rotator cuff.
Major Contributor of Rotator Cuff Tear |
What To Do To Help |
Poor posture and bad form, especially during exercise. |
Emphasize proper scapular position when performing all arm exercises. |
Overuse in positions of high mechanical demand. |
Limit strength exercises that work the rotator cuff at its end range of motion, and stretch when tight. |
What Can You Do To Prevent Rotator Cuff Tears?
While all of the rotator cuff muscles can be isolated and strengthened through various exercises, their true function is to work together to maintain stability of the shoulder joint. If you want a well-rounded rotator cuff training routine, you need to include more than just the basic internal- and external-rotation exercises.
Flexibility is an important component of a healthy rotator cuff, so be sure to maintain flexibility in the entire upper quarter of your body. Lack of flexibility in one part of your body causes the joints next to it to compensate. Before you can perform exercises with the best technique, you must have enough range of motion to do them properly.
The following exercises are categorized by flexibility, isolated strength, and functional strength, so you have all the tools to create the most comprehensive rotator cuff training program.
Start with the flexibility exercises, progress to the isolated strength work, and finally implement the functional strength exercises. Make sure to go through each phase if you want to build bulletproof shoulders.
Flexibility: Improve Shoulder Range of Motion
1. Doorway Stretch.
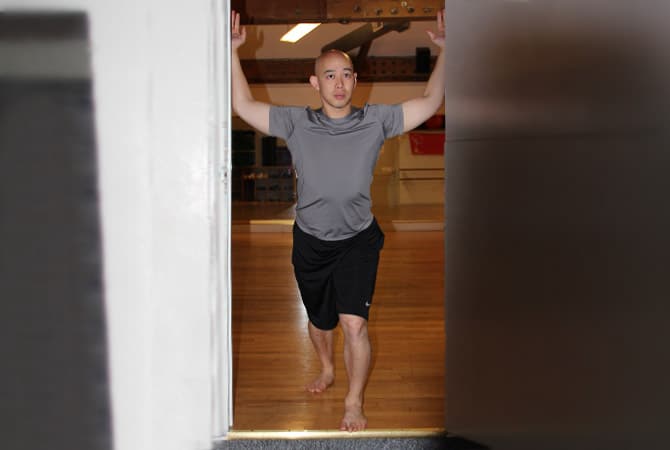
This stretch targets the anterior shoulder.
If you can’t stand with your back to the wall and your arms in the 90-90 position touching the wall, then you absolutely need to add this stretch into your daily routine. Stretch the front of your chest (pec minor and pec major) and anterior shoulder with this simple doorway stretch. Hold the stretch for 30 seconds, and repeat 3 times.
Instructions: Standing in a doorway, raise your arms to 90° (like cactus arms) with your arms against each side of the doorframe. Stagger your stance, stepping your right foot forward and your left foot back. Pack your shoulder blades down your back and tighten your core, then lean your weight forward until you feel a stretch in your chest and the front of your shoulders.
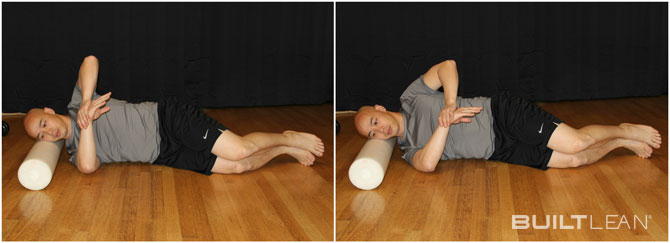
2. Sleeper Stretch
Unless you grew up playing baseball, volleyball, or tennis regularly, you should have about equals amount of internal rotation on both shoulders. If you did play sports when you were young, your total range of motion (internal PLUS external rotation) should be the same.
If your numbers don’t measure up, you most likely have what’s called Glenohumeral Internal Rotation Deficit (or GIRD). To increase your degree of internal rotation, add the sleeper stretch to your warm-up routine. Hold the stretch for 30 seconds, and repeat 3 times.
Instructions: Laying on your side with your head supported by a foam roller or pillow, bring your bottom arm to 90° from your shoulder with your elbow touching the ground and your forearm pointed towards the ceiling. Using your top arm, gently press your bottom forearm towards the floor until you feel a stretch in the back of your shoulder. This stretch should be painless
3. Standing Wall Angels
It’s very important that you maintain proper form with all your movements, which requires that you have adequate range of motion in your joints.
A great exercise to warm-up your shoulder muscles and also help you focus on form is the standing wall angel. If you do this and it feels easy, you’re either extremely flexible, or more likely, just not doing it right.
Instructions: Stand with your head, upper back, and tailbone against a wall, and your feet about 6 inches in front of you. With bent elbows, bring your arms to touch the wall so that both your hands and elbows make contact. Keeping your hands, elbows, head, and back against the wall, begin to raise your arms overhead by sliding them up against the wall. Then pull your arms down until your hands are about head-height. Continue to slide your arms up and down the wall without losing your points of contact.
Perform this exercise for 30-60 seconds, two times per day.
Strength: Isolated Rotator Cuff Exercises
Training your rotator cuff isn’t like training your biceps or triceps. The rotator cuff muscles need endurance as opposed to maximal strength because they need to work every time you move your arm. So your focus with these strength exercises should be high repetition with low load.
That’s why the light elastic bands are one of the best tools for these exercises.
For those recently diagnosed with a rotator cuff tear, you should only do these exercises as long as they are not painful. If they hurt, perform them without resistance. If you’re pain-free, then proceed.
4. External Rotation at Neutral
At first, try this exercise while lying on your side so you can focus on the movement and keep your shoulders in place.
Once that’s easy, stand and use a resistance band. Maintain a neutral spine, tight core, and shoulders away from the ears.
As you get stronger, progress to greater resistances and higher speeds.
Instructions: Set a resistance band or a cable machine at about belly button-height. Stand sideways next to the anchor and grab the resistance band with your outside hand. Keeping your elbow in to your side, pull the band out to the side by squeezing your shoulder blade onto your back. With control, bring the band back to the start position and repeat. Complete 3 sets of 15 reps.
5. External Rotation at 90-Degree Abduction.
Initially, start face-down with either no weight or a very light weight, and perform this exercise with perfect form without pain.
Once that gets easy, move on to a standing variation using a resistance band.
Instructions: Set a cable machine or resistance band at about chest-height. Hold the handle in your right hand and raise your elbow up to the height of your shoulder. Pack your shoulder blades down your back and brace your core. Pull the band so your forearm reaches towards the ceiling (stacking your wrist over your elbow) and squeeze your shoulder blade. Do your best to maintain a straight wrist. Then slowly return the band back to the start position, and repeat. Complete 3 sets of 10 reps.
6. Wall Crawl with External Rotation
This is one of my favorite exercises because it’s simple, and it challenges the shoulder in multiple directions and angles.
Place a resistance band around your wrists. Your focus throughout the exercise should be on keeping your forearms apart and vertically stacked (wrist over elbow) as you crawl up the wall. Once you get to the top, slowly crawl back down. Try not to cheat by arching your back!
Instructions: Lean into a wall with a resistance band around your forearms, and parallel your forearms so they’re about shoulder-width apart. Keep this space between your forearms, and begin to crawl your arms up the wall while keeping your shoulder blades down your back. Then crawl your arms back down. Continue to crawl up and down for 30 seconds. Repeat 3x.
Strength: Complete Shoulder Girdle Exercises
At this point, you should have improved your shoulder flexibility, and performing isolated rotator cuff exercises with excellent form should be a breeze.
These two exercises challenge the entire shoulder complex.
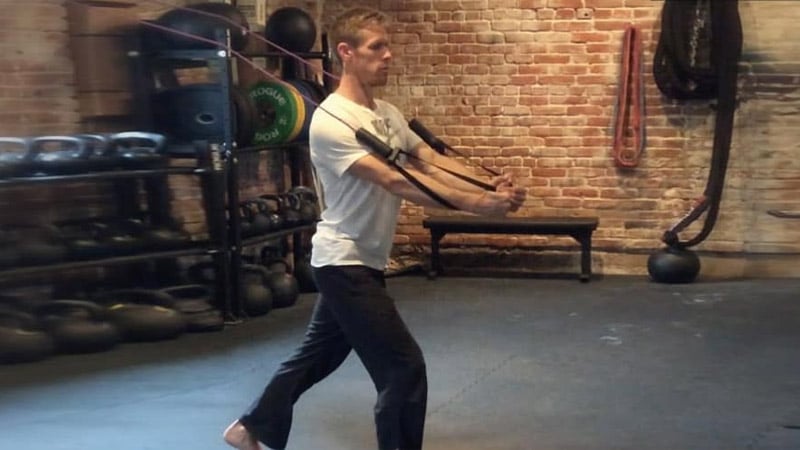
7. Serratus Scoop
This exercise emphasizes the serratus anterior muscle, which helps rotate your scapula forward and up so that your upper trapezius doesn’t engage and pull your shoulder blade out of position. Throughout this exercise, the top of your shoulder (the upper trapezius) should remain soft and relaxed.
Instructions: Using a resistance band, start with your elbows bent to 90° at your side, then scoop your arms up and forward. Make sure to keep your shoulders down and away from your ears, and brace your core. Complete 3 sets of 10 reps.
8. Inverted Rows
What exercise has been correlated with more throwing power than pushups, tricep strength and rotator cuff strength? Inverted Rows! This is because inverted rows build incredible back strength. Strengthening your middle- and lower-trapezius muscles will not only improve your posture, but also help keep your shoulder in its proper position allowing your other muscles to work in more biomechanically efficient positions.
Keep your elbows wide and your upper trapezius relaxed.
Instructions: Using a TRX or a squat rack, lean back with straight arms and pack your shoulder blades. Brace your core and squeeze your glutes, so your body forms one straight line. Then draw your elbows wide to pull your body towards the bar or anchor. Squeeze your shoulder blades at the top, and then lower back to the start with control. Complete 3 sets of 10 reps.
Functional Training: Shoulder-Specific Exercises
The purpose of these exercises is injury prevention and building powerful shoulders, so your main goal is to execute each repetition perfectly every single time.
If you’ve taken the time to progress through each exercise stage, then your shoulders should now be strong, flexible, and pain-free. Now it’s time to challenge your entire upper body. Here are two great exercises that will build you well-rounded shoulder while also emphasizing your core.
9. KB Plank Drag
Not only does your rotator cuff have to fire to stabilize the shoulder during this exercise, but it also works your serratus anterior, scapula stabilizers, and abdominals. Additionally, by dragging a weight from side-to-side, you challenge your traps and infraspinatus!
Instructions: Start in a high plank position with a dumbbell or kettlebell just outside your right hand. Reach underneath your body with your left hand, grab the weight, and drag it outside of your left shoulder. Repeat with the right hand, reaching under to grab the weight on the left. Keep your shoulders packed, your core tight, and your hips stable as you drag the weight from one side to the other underneath your body. Complete 3 sets for 30 seconds each.
10. Turkish Get Up
I love how this exercise is becoming popular again. It’s a fantastic exercise because both shoulders get a workout – the one on the floor has to support your body, and the one in the air must dynamically stabilize the weight over you.
Tip: The most common mistake I see when people perform the Turkish Get Up is they collapse into the shoulder of their grounded arm. Always press through the ground to active your lats, pull your shoulder back, and sit tall through your chest.
Building strong, flexible, injury-resistant shoulders is possible whether you’ve previously been injured or not. By starting with the basics of flexibility exercises and isolated strength work, you create a solid foundation upon which to challenge yourself with more total-body, functional exercises. Always focus on exercising with the best possible technique, and you can keep your rotator cuff healthy for the long-term.

© 2019 BuiltLean LLC | All rights reserved.